Part 2: Accessing wallets
Accessing the user's wallet is a prerequisite for interacting with the Tezos blockchain. Accessing the wallet allows your app to see the tokens in it and to prompt the user to submit transactions, but it does not give your app direct control over the wallet. Users must still confirm all transactions in their wallet application.
Using a wallet application in this way saves you from having to implement payment processing and security in your application. As you see in this section, it takes only a few lines of code to connect to a user's wallet.
Creating and funding a wallet
To use the application, you need a wallet and some tez tokens.
-
Install a Tezos-compatible wallet. Which wallet you install is up to you and whether you want to install a wallet on your computer, in a browser extension, or as a mobile app.
If you don't know which one to choose, try the Temple browser extension, because then you can use it in the same browser that you are using to view the web app.
Desktop wallets for Tezos include the Temple browser extension, Kukai, and Umami.
-
Switch the wallet to use the Ghostnet testnet instead of Tezos Mainnet. Ghostnet is a network for testing Tezos applications where tokens are free so you don't have to spend real currency to work with your applications.
For example, for the Temple browser wallet, click Tezos Mainnet at the top and then click Ghostnet Testnet, as in this picture:

-
From your wallet, get the address of your account, which starts with
tz1. This is the address that applications use to work with your wallet. -
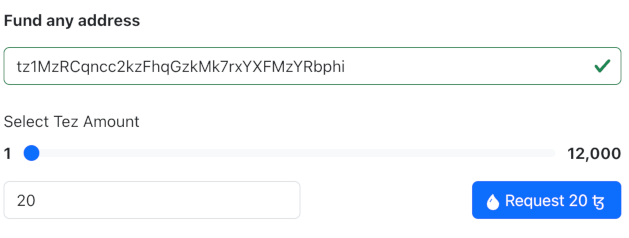
Go to the Ghostnet faucet page at https://faucet.ghostnet.teztnets.com.
-
On the faucet page, paste your wallet address into the input field labeled "Or fund any address" and click the button for the amount of tez to add to your wallet. 20 tez is enough to work with the tutorial application, and you can return to the faucet later if you need more tez.
It may take a few minutes for the faucet to send the tokens and for those tokens to appear in your wallet.
You can use the faucet as much as you need to get tokens on the testnet, but those tokens are worthless and cannot be used on Mainnet.
-
If you created a new account, initialize the account by sending any amount of tez to any other account.
Before the new account can use dApps, it must send at least one transaction to Tezos. This first transaction reveals the public key that proves that transactions came from this account.
If your account is new, you can send 1 tez to any other account, including your own account, via your wallet application to reveal the account.
Now you have an account and funds that you can use in dApps.
Connecting to the user's wallet
In this section, you add code to connect to the user's wallet with the Taquito TezosToolkit and Beacon BeaconWallet objects.
Taquito accesses Tezos and Beacon accesses wallets.
IMPORTANT: however you design your app, it is essential to use a single instance of the BeaconWallet object.
It is also highly recommended use a single instance of the TezosToolkit object.
Creating multiple instances can cause problems in your app and with Taquito in general.
This application keeps these objects in the App.svelte file because this is the only component in the application.
If you add more components, you should move these objects to a separate file to maintain a single instance of them.
-
In the
src/App.sveltefile, add these imports to the<script>section:import { BeaconWallet } from "@taquito/beacon-wallet";
import { NetworkType } from "@airgap/beacon-types";
import { TezosToolkit } from "@taquito/taquito"; -
Under those imports, create these constants that represent the Taquito toolkit's access to Tezos:
const rpcUrl = "https://ghostnet.ecadinfra.com";
const Tezos = new TezosToolkit(rpcUrl); -
Create variables to represent the wallet itself, its account address, and its balance:
let wallet;
let address;
let balance; -
Still within the
<script>section, add this function to connect to the user's wallet:const connectWallet = async () => {
const newWallet = new BeaconWallet({
name: "Simple dApp tutorial",
network: {
type: NetworkType.GHOSTNET,
},
});
await newWallet.requestPermissions();
address = await newWallet.getPKH();
getWalletBalance(address);
wallet = newWallet;
};This function creates an instance of the Beacon wallet toolkit, uses the
requestPermissions()function to ask the user's permission to connect to it, and retrieves its address and balance. It provides a name for the app, which appears in the wallet UI when it asks the user to allow the connection. It also includes the network to use, such as the Tezos main network or test network. -
Add this function to disconnect from the user's wallet:
const disconnectWallet = () => {
wallet.client.clearActiveAccount();
wallet = undefined;
}; -
Add this function to get the wallet's balance:
const getWalletBalance = async (walletAddress) => {
const balanceMutez = await Tezos.tz.getBalance(walletAddress);
balance = balanceMutez.div(1000000).toFormat(2);
}; -
Update the
<main>section to have this code:<h1>Tezos bank dApp</h1>
<div class="card">
{#if wallet}
<p>The address of the connected wallet is {address}.</p>
<p>Its balance in tez is {balance}.</p>
<p>To get tez, go to <a href="https://faucet.ghostnet.teztnets.com/" target="_blank">
https://faucet.ghostnet.teztnets.com/
</a>.
</p>
<p>
<button on:click={disconnectWallet}> Disconnect wallet </button>
</p>
{:else}
<button on:click={connectWallet}> Connect wallet </button>
{/if}
</div>The
ifcondition in this code shows a button to connect to a wallet if there is no connected wallet. If there is a connected wallet, it shows the address and balance of the wallet in tez.The application could connect immediately when the page loads, but it's better user experience to let the page load first and allow the user to connect the wallet when they trust the application. Connecting the wallet is harmless because it does not give the application any control over the user's account, but it is still better user experience to keep the user in control. For this reason, dApps should have prominent buttons to connect and disconnect wallets.
The complete App.svelte file looks like this:
<script>
import { BeaconWallet } from "@taquito/beacon-wallet";
import { NetworkType } from "@airgap/beacon-types";
import { TezosToolkit } from "@taquito/taquito";
const rpcUrl = "https://ghostnet.ecadinfra.com";
const Tezos = new TezosToolkit(rpcUrl);
let wallet;
let address;
let balance;
const connectWallet = async () => {
  const newWallet = new BeaconWallet({
    name: "Simple dApp tutorial",
    network: {
     type: NetworkType.GHOSTNET,
   },
  });
  await newWallet.requestPermissions();
  address = await newWallet.getPKH();
  getWalletBalance(address);
  wallet = newWallet;
};
const disconnectWallet = () => {
  wallet.client.clearActiveAccount();
  wallet = undefined;
};
const getWalletBalance = async (walletAddress) => {
  const balanceMutez = await Tezos.tz.getBalance(walletAddress);
  balance = balanceMutez.div(1000000).toFormat(2);
};
</script>
<main>
<h1>Tezos bank dApp</h1>
<div class="card">
{#if wallet}
<p>The address of the connected wallet is {address}.</p>
<p>Its balance in tez is {balance}.</p>
<p>
To get tez, go to <a
href="https://faucet.ghostnet.teztnets.com/"
target="_blank"
>
https://faucet.ghostnet.teztnets.com/
</a>.
</p>
<p>
<button on:click={disconnectWallet}> Disconnect wallet </button>
</p>
{:else}
<button on:click={connectWallet}> Connect wallet </button>
{/if}
</div>
</main>
<style>
</style>
Using the application
To try the application, run npm run dev and open the page http://localhost:4000/ in a web browser.
Because no wallet is connected, the app shows the "Connect wallet" button, as in this picture:

When you click Connect wallet, the connectWallet function runs and the Beacon toolkit opens, showing some of the types of wallets it can connect to:
![]()
The procedure for connecting each type of wallet is different. For example, if you are using the Temple browser extension, you click Temple and then Connect now. Then the Temple wallet shows a popup that allows you to confirm that you want to connect your wallet to the application, as in this picture:

Then the application runs the getWalletBalance function, which gets the wallet's balance in tez tokens.
Because the Svelte component's variables changed, the application refreshes automatically and shows the wallet address, balance, and "Disconnect wallet" button:

If you click Disconnect wallet, the application goes back to its initial state.
Now the application can connect to user wallets. In the next section, you add code to use the wallet to get the user's approval to send transactions to Tezos.
Design considerations
Interacting with a wallet in a decentralized application is a new paradigm for many developers and users. Follow these practices to make the process easier for users:
-
Let users manually connect their wallets instead of prompting users to connect their wallet immediately when the app loads. Getting a wallet pop-up window before the user can see the page is annoying. Also, users may hesitate to connect a wallet before they have had time to look at and trust the application, even though connecting the wallet is harmless.
-
Provide a prominent button to connect and disconnect wallets.
-
Put the button in a predictable position, typically at the top right or left corner of the interface.
-
Use "Connect" as the label for the button. Avoid words like "sync" because they can have different meanings in dApps.
-
Display the status of the wallet clearly in the UI. You can also add information about the wallet, including token balances and the connected network for the user's convenience, as this tutorial application does. Showing information about the tokens and updating it after transactions allows the user to verify that the application is working properly.
-
Enable and disable functions of the application based on the status of the wallet connection. For example, if the wallet is not connected, disable buttons for transactions that require a wallet connection. Also, disable transaction buttons while transactions are pending to prevent users from making duplicate transactions.