Create NFTs from the command line
This tutorial covers how to create a collection of NFTs on Tezos and manipulate them using the tznft command-line tool.
No prior knowledge of NFTs or Tezos is required, but you need basic experience with your computer's command-line terminal to paste commands and run them.
In this tutorial, you will learn:
- What NFTs are
- How to install and start a local Tezos sandbox environment
- How to create metadata files to describe NFT collections and individual NFTs
- How to deploy (or mint) the NFTs to the sandbox
- How to transfer NFTs and change operator permissions for them
- How to mint NFTs to a testnet
What is a non-fungible token (NFT)?
An NFT is a special type of blockchain token that represents something unique. Fungible tokens such as XTZ and real-world currencies like dollars and euros are interchangeable; each one is the same as every other. By contrast, each NFT is unique and not interchangeable. NFTs can represent ownership over digital or physical assets like virtual collectibles or unique artwork, or anything that you want them to represent.
Like other types of Tezos tokens, a collection of NFTs is managed by a smart contract. The smart contract defines what information is in each token and how the tokens behave, such as what happens when a user transfers an NFT to another user.
In this tutorial, you create NFTs that comply with the FA2 standard (formally known as the TZIP-12 standard), the current standard for tokens on Tezos. The FA2 standard creates a framework for how tokens behave on Tezos, including fungible, non-fungible, and other types of tokens. It provides a standard API to transfer tokens, check token balances, manage operators (addresses that are permitted to transfer tokens on behalf of the token owner), and manage token metadata.
Prerequisites
To run this tutorial you need Node.JS, NPM, and Docker Desktop to install and use the tznft CLI tool, which helps you create and test NFT collections on Tezos.
-
Install Node.JS version 18 (not 20) and NPM. See https://nodejs.org/. You can verify that they are installed by running these commands:
node --version
npm --version
If you see a message with the versions of Node.JS and NPM, they are installed correctly.
-
To install Docker Desktop, see https://www.docker.com. Make sure to start Docker Desktop after you install it.
-
To install the
tznfttool, run this command:npm install -g @oxheadalpha/tznftYou can verify that it is installed by running this command:
tznft --versionIf you see a message with the version of the
tznfttool, it is installed correctly.
Create a project folder
-
Create a folder to store your NFT configuration files:
mkdir nft-tutorial
cd nft-tutorial -
Create a starter NFT configuration file:
tznft initThe resulting file, named
tznft.config, contains information about the Tezos networks that are available for you to work with, including the Ghostnet test network and the local sandbox that you set up in the next steps. Thetznfttool requires this file, so the commands in the following steps work only from the directory that you rantznft initin. -
Check that the default active network is "sandbox:"
tznft show-networkThe response should show that the active network is "sandbox." The sandbox is a local simulation of Tezos that you can use to test your work.
-
Set up a local Tezos sandbox by running this command:
tznft bootstrapThis command can take time to run, so wait until you see the message "sandbox started."
This command uses the Flextesa tool to create a local sandbox in a Docker container. This sandbox is a local instance of Tezos that you can use to test your work before you send it to a live Tezos network. The sandbox comes preconfigured with two account aliases named
bobandalicethat you can use to test account operations like creating and transferring NFTs.You can verify that the sandbox is running by running the command
docker psand looking for a container namedflextesa-sandbox. To stop the container, run the commandtznft kill-sandbox, but beware that stopping the container sets the sandbox back to its initial state, which removes any changes you made or contracts or tokens that you created.Unlike the live Tezos networks, this sandbox bakes a new block every 5 seconds. Therefore, commands that you run on the sandbox can take a few seconds to complete.
Create NFT metadata
The first step in creating NFTs is to create local metadata files that describe the collection and the individual NFTs:
-
Create a collection metadata file by running this command:
tznft create-collection-meta my_collectionThe new metadata file is named
my_collection.jsonand has information such as the name, description, home page, and creator of the collection. It also includes the interfaces that the NFTs support, including the TZIP-12 interface that was mentioned earlier. -
Optional: Edit the
my_collection.jsonfile to put your information in thename,description, andauthorsfields. -
Validate the collection by running this command:
tznft validate-collection-meta my_collection.jsonIf you did not change values in the file, this command may show warnings that the collection uses placeholder values. You can continue with these placeholder values or insert your own information. If there are any errors, make sure that the file is valid JSON.
-
Create a metadata file for the first NFT in the collection by running this command:
tznft create-nft-meta Token1 bob ipfs://QmRyTc9KbD7ZSkmEf4e7fk6A44RPciW5pM4iyqRGrhbyvjThis command creates a metadata file named
Token1.jsonwith default information about the NFT. It includes the minter's account address and URIs to pictures that represent the NFT. In this case, theipfsURI links to a picture of the Tezos logo, which you can see at this link: https://ipfs.io/ipfs/QmRyTc9KbD7ZSkmEf4e7fk6A44RPciW5pM4iyqRGrhbyvj. -
Optional: Edit the metadata such as the name and description fields in the
Token1.jsonfile. -
Optional: Edit other fields in the metadata based on the FA2 standard.
For example, you can expand the
attributessection with other attributes. Each attribute must have thenameandvaluefields and can optionally have atypefield, as in this example:"attributes": [
{
"name": "My string attribute",
"value": "String attribute value"
},
{
"name": "My integer attribute",
"value": "5",
"type": "integer"
},
{
"name": "My number attribute",
"value": "12.3",
"type": "number"
},
{
"name": "My percentage attribute",
"value": "19",
"type": "percentage"
}
]By default the
artifactUri,displayUri, andthumbnailUrifields are set to the picture that you passed in thetznft create-nft-metacommand. You can update these to different images to allow applications to show media to represent the NFT. You can also add aformatsobject to provide media in different formats, such as different image, video, or audio formats:"formats": [
{
"uri": "ipfs://QmRyTc9KbD7ZSkmEf4e7fk6A44RPciW5pM4iyqRGrhbyvj",
"hash": "a56017a1317b1bc900acdaf600874c00e5c048d30894f452049db6dcef6e4f0d",
"mimeType": "image/svg+xml"
},
{
"uri": "ipfs://QmRyTc9KbD7ZSkmEf4e7fk6A44RPciW5pM4iyqRGrhbyvj",
"hash": "8968db6bde43255876c464613a31fbd0416ca7d74be4c5ae86c1450418528302",
"mimeType": "image/png",
"dimensions": {
"value": "512x512",
"unit": "px"
}
},
{
"uri": "ipfs://QmRyTc9KbD7ZSkmEf4e7fk6A44RPciW5pM4iyqRGrhbyvj",
"hash": "d4a93fc8d8991caa9b52c04c5ff7edf5c4bc29317a373e3a97f1398c697d6714",
"mimeType": "model/gltf+json"
}
]For specifics about what is allowed in an NFT metadata file, see the TZIP-21 standard.
-
Validate the NFT metadata file with this command:
tznft validate-nft-meta Token1.jsonIf the file does not validate, verify that it is valid JSON and has only the fields listed in the TZIP-21 standard.
-
Create at least one more metadata file for other NFTs by running commands like this example:
tznft create-nft-meta Token2 bob ipfs://QmRyTc9KbD7ZSkmEf4e7fk6A44RPciW5pM4iyqRGrhbyvj
Configure IPFS storage
Because storage space on blockchains is expensive, developers don't put entire token metadata files on Tezos. Instead, they configure decentralized storage for the NFT data and put only the link to that data on Tezos itself. In this section, you set up storage for the NFT metadata using the InterPlanetary File System (IPFS) protocol.
IPFS requires authentication just like blockchain transactions, so in this section you set up an account with the Pinata IPFS provider and use it to upload (or pin) the NFT data to IPFS.
-
Create a free Pinata account at https://app.pinata.cloud/developers/api-keys.
-
Go to the API Keys tab and click New Key.
-
On the Create New API Key page, expand API Endpoint Access and enable the
pinFileToIPFSpermission, as in this picture: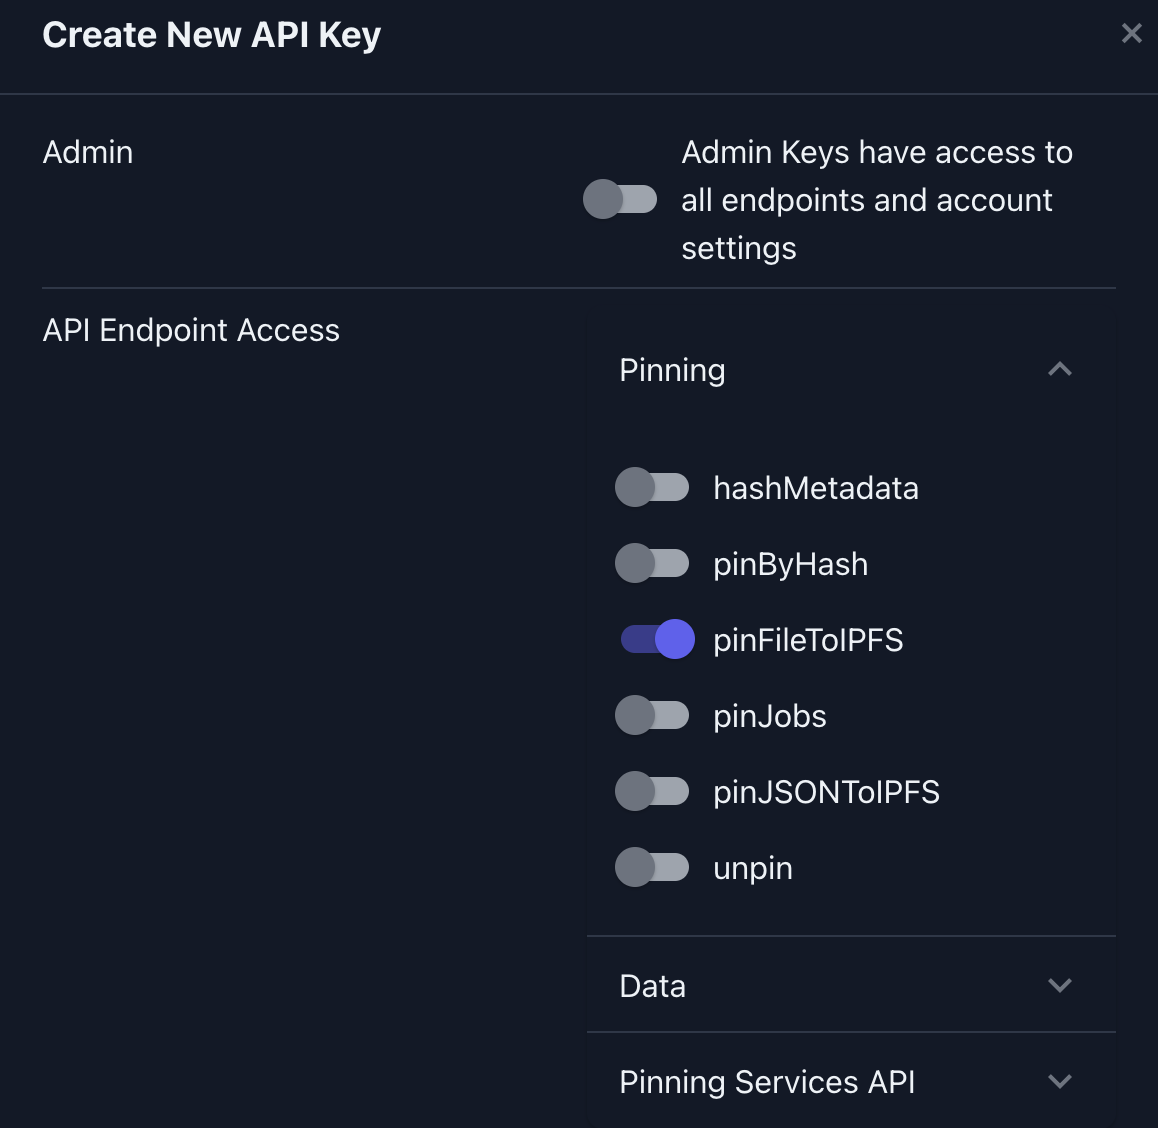
-
In the Key Name field, give the key a name, such as "My Key."
-
Click Create Key.
The API Key Info window shows the API key and secret, which you must copy immediately, because it is not shown again.
-
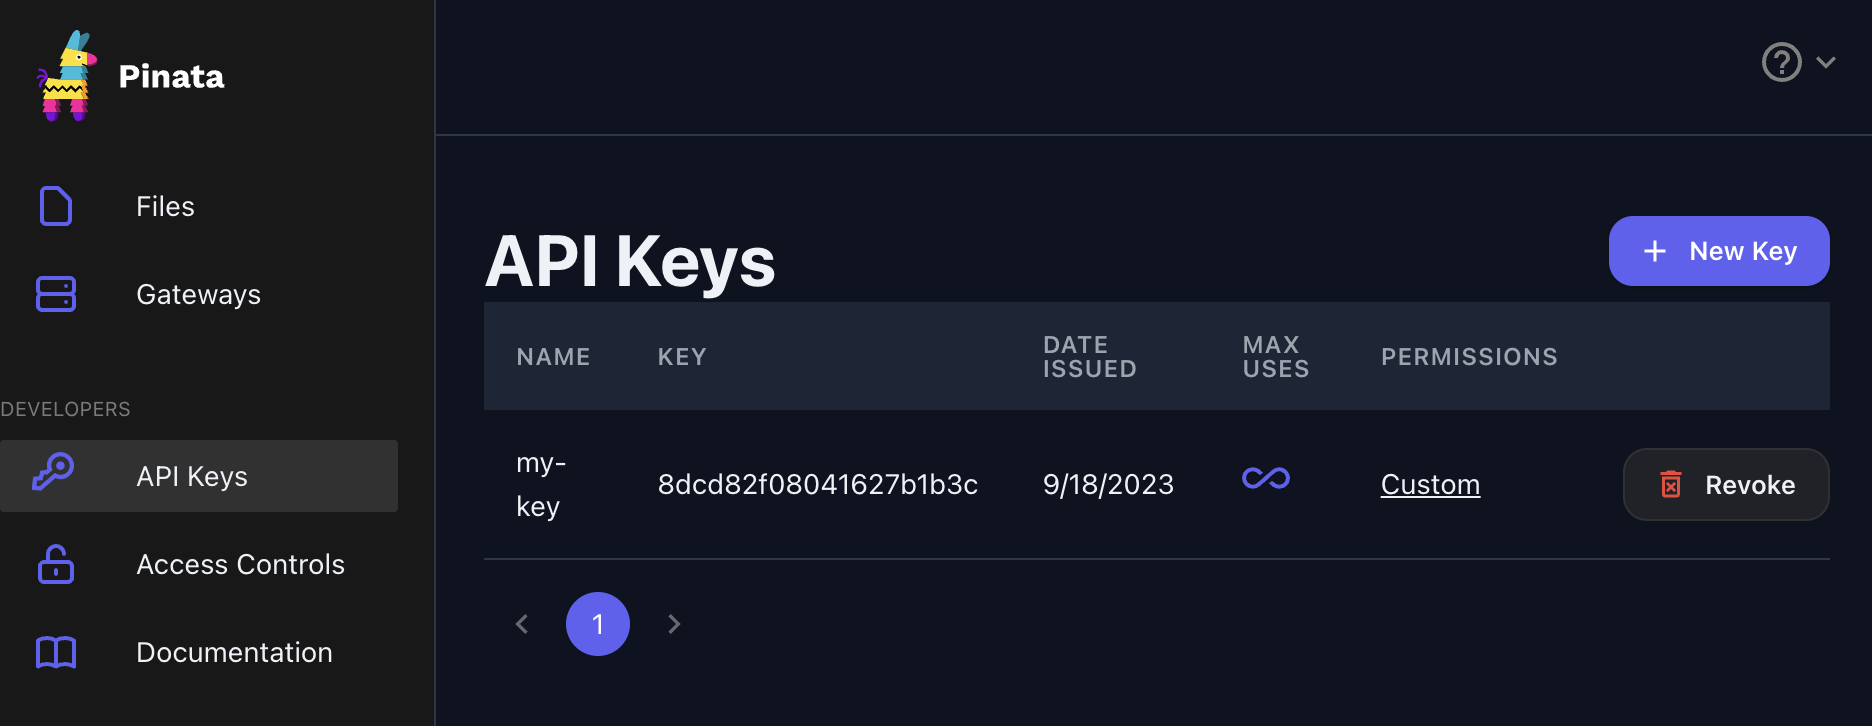
Copy the API Key and API Secret fields and save the values on your computer. You need these values in the next section.
You can see the new API key on the API Keys tab:
-
Add the API key and secret to your local
tznftconfiguration by running this command, replacing$PINATA_KEYand$PINATA_SECRETwith your API key and secret:tznft set-pinata-keys $PINATA_KEY $PINATA_SECRET --forceThis command stores the key and secret in the
tznft.jsonfile, so be careful not to share this file. -
Pin the first NFT metadata file to IPFS by running this command and passing the file name and a tag for the NFT, which can be the same as the file name:
tznft pin-file Token1.json --tag Token1The command returns the URI for the data on IPFS, which starts with
ipfs://. -
Copy the IPFS URI, because you will need it later.
-
In the same way, pin the other NFT metadata files with the
tznft pin-filecommand and save their URIs. -
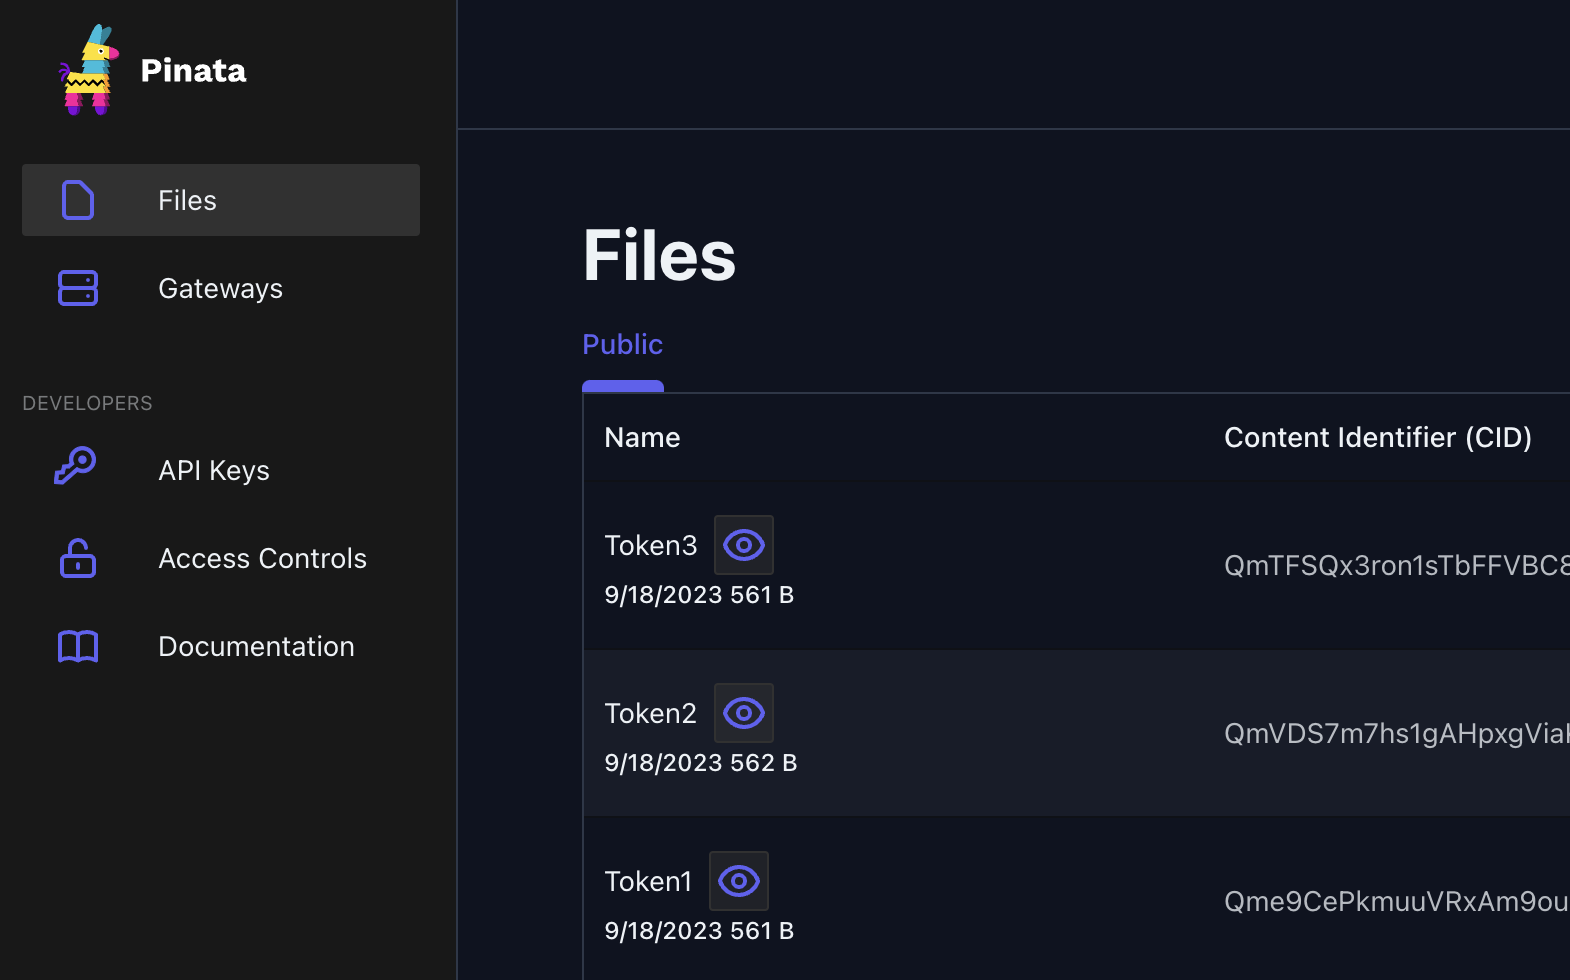
Optional: Verify that the files are pinned successfully by opening the Pinata app to the Files page, as in this picture:
Now that the metadata is pinned to IPFS, you can create NFTs that link to this metadata.
Mint NFTs
Creating NFTs is called minting.
First, you create the smart contract to manage the NFTs.
Then, you mint one or more NFTs with that contract.
The related tznft commands use the configuration files that you created earlier.
-
Create the collection contract from the metadata file by running this command:
tznft create-collection bob --meta_file my_collection.json --alias my_collectionThis command takes the alias of the user who is the owner of the collection. In this case, the owner is one of the default accounts in the sandbox. The command also includes the metadata file and an optional local alias for the collection.
The command also updates the
tznft.jsonfile with information about the new collection, including the address of the smart contract that manages the collection. This smart contract is a pre-compiled FA2 NFT contract written in the LIGO smart contract language. You can write your own smart contracts to manage NFTs, but using this contract prevents errors and provides all of the functionality needed to create, transfer, and manage NFTs. -
Run this command to create a token and set Bob as the owner, replacing the IPFS URI with the URI that the
tznft pin-filecommand returned in the previous section:tznft mint bob my_collection --tokens '1, ipfs://abcde12345'This command includes these parameters:
- The alias or address of the initial owner.
- The alias of the collection from the
tznft create-collectioncommand. - The ID number and IPFS URI for the NFTs in a comma-delimited string.
If you forgot the IPFS URI, you can look it up in the Pinata app on the Files tab. This tab has a column labeled "Content Identifier (CID)." To create the IPFS URI, add the content identifier to the string
ipfs://.The response in the terminal says that the token was minted.
-
Run the
tznft mintcommand to mint the other NFTs. You can create more than one NFT in a single command by providing more than one string after the--tokensswitch, as in this example:tznft mint bob my_collection --tokens '2, ipfs://defgh12345' '3, ipfs://ijklm12345' -
Verify that the NFTs were minted successfully by getting their metadata with the
tznft show-metacommand:tznft show-meta bob --nft my_collection --tokens 1 2If the NFTs were created successfully, the command prints the metadata that you pinned to IPFS.
Now the NFTs are minted to the sandbox.
Because these NFTs are only on your local computer, in the Flextesa sandbox, you can interact with them only locally.
They exist as long as you keep the Flextesa Docker container running, which you started with the tznft bootstrap command.
Transferring and manipulating NFTs
The tznft command provides commands to manipulate NFTs locally, including transferring them between accounts.
Just like transactions on live blockchain networks, the transaction signer must have permission to transfer or manipulate the NFTs.
Currently, only Bob has access to the NFTs, so the tznft commands include him as the signer of most transactions.
-
Use the
tznft show-balancecommand to print information about Bob's NFTs. This command takes the alias or address of the collection, the signer of the transaction, the owner of the NFTs, and the IDs of one or more NFTs.tznft show-balance --nft my_collection --signer bob --owner bob --tokens 1 2Because NFTs are unique, the response shows a balance of 1 if the account owns the token and 0 if it does not, as in this picture:

-
Use the
tznft show-balancecommand to print information about Alice's NFTs:tznft show-balance --nft my_collection --signer alice --owner alice --tokens 1 2Because Bob is the initial owner of all of the NFTs, Alice's balance is 0 for each NFT.
-
Use the
tznft transfercommand to transfer one or more NFTs from Bob to Alice. This command takes the alias or address of the collection, the signer, and one or more comma-separated strings with the current owner, the new owner, and the ID of the NFT to transfer. For example, this command transfers NFTs 1 and 2 from Bob to Alice:tznft transfer --nft my_collection --signer bob --batch 'bob, alice, 1' 'bob, alice, 2' -
Verify that the transfer worked by checking Alice's balance with the
tznft show-balancecommand:tznft show-balance --nft my_collection --signer alice --owner alice --tokens 1 2Now Alice's balance is 1 for each token that transferred. Alice is in control of these NFTs and Bob can no longer transfer them.
-
Verify that Bob does not have control over the transferred NFTs by trying to transfer them back from Alice's account to Bob's account:
tznft transfer --nft my_collection --signer bob --batch 'alice, bob, 1' 'alice, bob, 2'The response shows the error "FA2_NOT_OPERATOR" because Bob's account is not in control of these NFTs.
You can give Bob's account control over the NFTs by making his account an operator of those NFTs.
-
Make Bob an operator of Alice's NFTs by passing the token IDs to the
tznft update-opscommand:tznft update-ops alice --nft my_collection --add 'bob, 1' 'bob, 2' -
Try again to transfer the NFTs from Alice's account to Bob's account with a transaction signed by Bob:
tznft transfer --nft my_collection --signer bob --batch 'alice, bob, 1' 'alice, bob, 2' -
Check Bob's account to see that he now owns the NFTs:
tznft show-balance --nft my_collection --signer bob --owner bob --tokens 1 2
Freeze the collection
When you have created all of the NFTs that you want, freeze the collection so it cannot be changed and no more NFTs can be added by running this command:
tznft mint-freeze bob my_collection
Mint tokens on a testnet
So far, the NFTs that you have created are available only in your local sandbox. When you are satisfied with the NFTs and how they behave, you can send them to a testnet and test them there. You can use the same configuration files and IPFS data as you used on the sandbox.
By default, the tznft.json file has configuration information for the Tezos Ghostnet testnet, where you can test your tokens on a running Tezos network.
-
Show the available networks by running the command
tznft show-network --alland verify that the testnet is in the list. -
Change the
tznfttool to use the testnet instead of your local sandbox:tznft set-network testnet -
Run the
tznft bootstrapcommand to get the testnet ready for your use. Now that the network is set to testnet, this command deploys a helper balance inspector contract to testnet that allows thetznftcommand to get information from the testnet. You only need to run this command for testnet once. -
Create an alias on the testnet to own the NFTs. You can do this in either of these two ways:
-
If you have an existing Tezos wallet that supports testnets (such as Temple wallet), copy the private key from that wallet and use the
tznft add-aliascommand to create a local alias for it. For example, this command creates a wallet with the aliasmy-account:tznft add-alias my-account $TEZOS_PRIVATE_KEY -
Create a local wallet with the installation of the
octez-clientcommand within the Flextesa Docker container:-
Generate local keys with the
octez-client gen keyscommand. For example, this command creates keys for a wallet with the aliasmy-account:docker exec flextesa-sandbox octez-client gen keys my-account -
Get the keys for the wallet with this command:
docker exec flextesa-sandbox octez-client show address my-account -SThe response includes the hash, public key, and secret key for the wallet. For example, in this response, the secret key starts with "edsk3WR":

-
Add the secret key as an alias with the
tznftcommand, replacing$TEZOS_PRIVATE_KEYwith the value of the secret key from the previous command:tznft add-alias my-account $TEZOS_PRIVATE_KEY -
Add funds to the new wallet by going to the Ghostnet faucet at https://faucet.ghostnet.teztnets.com/, pasting the wallet's hash in the "Or fund any address" field, and clicking a button to request tokens. The wallet needs tokens to pay the fees to create the collection and mint the tokens on Ghostnet.
-
-
-
Create the collection on the testnet. The command is the same as for the sandbox, and you can create a new collection file or use the file from the sandbox. Similarly, you can use the same collection alias because
tznftkeeps aliases separate on different networks, but be sure not to get the aliases confused.tznft create-collection my-account --meta_file my_collection.json --alias my_collection -
Mint the tokens on the testnet. The command is the same as for the sandbox:
tznft mint my-account my_collection --tokens '1, ipfs://abcde12345'You can add more NFTs until you freeze the collection.
-
View your token balances. The command is the same as for the sandbox:
tznft show-balance --nft my_collection --signer my-account --owner my-account --tokens 1 -
View the tokens on a block explorer:
-
Get the address of the collection on the testnet from the
testnetsection of thetznft.jsonfile. The address starts with "KT1". -
Go to a block explorer, such as https://tzkt.io.
-
Set the block explorer to use testnet instead of Tezos Mainnet.
-
In the search field, paste the address of the collection and press Enter.
The block explorer shows information about the contract that manages the NFTs, including a list of all NFTs in the contract, who owns them, and a list of recent transactions.
-
Now the NFTs are on Tezos Ghostnet and you can transfer and manipulate them just like you did in the sandbox.
You may need to create and fund more account aliases to transfer them, but the commands are the same.
For example, to transfer NFTs to an account with the alias other-account, run this command:
tznft transfer --nft my_collection --signer my-account --batch 'my-account, other-account, 1' 'my-account, other-account, 2'
Summary
Now you can create, test, and deploy NFTs locally and to testnets. The process for minting NFTs to Tezos Mainnet is the same, but you must use an account with real XTZ in it to pay the transaction fees.
If you want to continue working with NFTs, try creating a marketplace for tokens as described in the tutorial Build an NFT Marketplace.